Overview
Making an XCOM-like, but your AI keeps doing dumb stuff? Is managing the AI a nightmare? Do you just wish there was an easy and scalable way to manage your AI fighters? Don’t worry, I got you! During the development of my turn based tactics game Aetherpunk Tactics (A.T) I ran into quite a problem: actually making a good AI opponent. The first AI I made was rubbish. It was essentially an unstructured mess of if and elif statements, which made the AI way too rigid for a complex game, and was a nightmare to work with. A.T features far too many variables for a simple conditional based AI. To solve this problem, I decided to study the AI of XCOM and other tactical AIs.
P.S It’s been a while since my last post! I did not intend to go radio silent for… over a year?! Life kind of happened and I haven’t really had time to post while I’ve been working on the game. I will try to keep making devlogs documenting my game dev journey with Aetherpunk Tactics.
Study: XCOM 2 AI
The AI in XCOM 2 seems to consist of some kind of behavior tree -esque setup. Essentially this means that the AI is just a bunch of conditions, just handled a bit more cleanly. I’m pretty sure targets are chosen by scoring them according to factors like HP-%, cover, distance etc. and picking a target with a high enough score. Positions are selected similarly, with each position being scored by checking if it is in cover, if it flanks an enemy and if it has line of sight to enemies. This kind of AI is called Utility AI.
What is Utility AI?
Utility AI is an algorithm which scores different decisions according to some designer made scoring functions and picks the best one (or picks options within a percentage of the best one). A designer assigns the algorithm different decisions, such as FIGHT, RETREAT, HEAL, and makes scoring functions for each of them which calculate the utility (score) of that decision.
An example of an utility AI is the following: Imagine you’re making a mage dude for your fighting game. The mage dude has the following decisions: CAST_FIREBALL, HEAL_SELF. The mage will then calculate the score for each decision, e.g:
Score CAST_FIREBALL
- If fireball on cooldown:
return 0 - If no enemy within range:
return 0 - If all checks are valid:
return 1
- If fireball on cooldown:
SCORE HEAL_SELF
- If heal on cooldown:
return 0 - Else:
return 1 - current_hp/max_hp
- If heal on cooldown:
The scoring functions are pretty simple. The enemy will always cast fireball if it is available and there are valid targets within range. Heal self doesn’t use constant scores, instead it uses math. Essentially, the lower the mage’s HP percentage of MAX HP, the higher the score for healing. For a character with 10 MAX HP, the score curve would look like this:
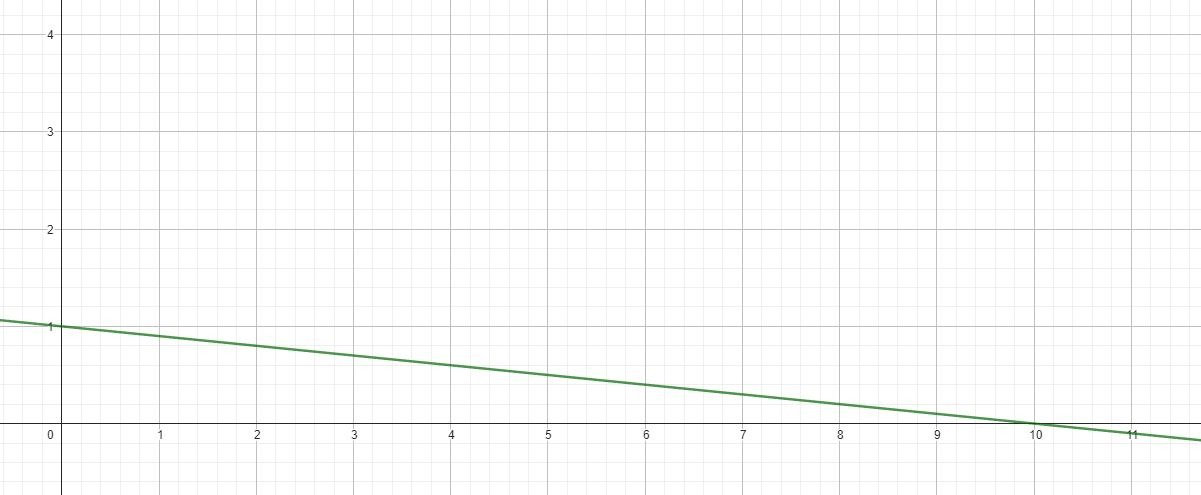 where Y is score and X is current hp. As you can see, the lower the current hp, the higher the score. The AI wants to heal at low HPs.
This mindset is the key behind Utility AI: converting abstract decision making into numbers that the computer can understand. The pros and cons of this type of AI are as follows:
Pros:
- Works great for any AI that needs to choose between a lot of different decisions
- Good option for complex strategy games
- Relatively easy to manage, and scalable
- Flexible, can easily be added to support any existing AI system, because it doesn’t do anything on its own except score stuff
Cons:
- Usually involves a lot of number tweaking to get it working as expected
- May become computationally expensive
- Lose fine control over the AI, as controlling the scoring can become tough
The Shaggy Dev has a very good blog post on Utility AI, which I recommend reading to get more information: https://shaggydev.com/2023/04/19/utility-ai/
Now that we know what Utility AI is, it’s time to actually implement it.
Implementing decision making
Aetherpunk Tactics is developed with Godot, as such the following sections will be written in GDScript. The principles should however be applicable to any game engine (that is worth using).
In the original system enemy AI was controlled by another Node in the scene tree, their faction node. This worked… but having all decision making for every different type of enemy be contained in one Node would be impossible to manage and scale.
First up, I moved decision making from the faction node to the units themselves. To structure decisions, I decided to make decisions their own class, that inherits Resource. It can also be done by inheriting Node, which is probably a better way of doing it…
class_name UtilityDecision extends Resource

@export var name : StringName
## Score can be multiplied by this if needed.
@export var weight : float = 1.0

var score : float = 0.0

## User of the decision must be passed in, since a resource cannot access scene tree.
func _get_score(user : Unit) -> float:
	return 0.0

func _perform(user : Unit) -> void:
	pass
So instead of XCOM 2’s behavior tree system, I decided to use Utility AI for decision selection. There’s nothing wrong with XCOM 2’s system, but I wanted to use scoring since my game has a lot of variables.
Each AI unit has an array of decisions. When the AI’s turn starts, the AI handler sequentially calls a perform function in each AI agent, and waits for that function to finish executing. The perform function goes through each decision and scores them. Then, the perform function picks the decision with the highest score, and calls perform on the decision, passing the unit into the function.
Decisions handle most logic independently, with some common features (move and use ability requests) in the Unit class. For example, the attack decision scores each target and returns the score of the best one as the decision score. Then, in the perform function it makes a request to the unit to use the chosen ability on the best target.
I won’t go over making scoring functions for targets and decisions too much, since it depends a lot on your game and it’s codebase. Note that a typical technique designers use is to map the values of the scoring function to a curve, to get even finer control.
The result? Now the AI can actually choose the current best option. However, this alone was not enough for smart behavior, as the AI doesn’t yet know where it should move. It doesn’t matter if the AI knows to attack if an enemy is about to die, if it can’t find a good position to attack from. If movement and positioning is not important in your game, congratulations! You have saved yourself from a world of pain. Unfortunately, positioning is very important in Aetherpunk Tactics, so I had to implement a position scoring API as well.
Implementing position selection
Influence map 101
XCOM 2 uses something called position maps for finding suitable positions. Essentially it just scores positions around the unit based on some factors. The system is similar to influence maps. An influence map stores scores for positions. In my case, the influence map is just a custom resource:
class_name InfluenceMap extends Resource

var influence : Dictionary[Vector3, float] = {}
If you have a grid based game, using a basic dictionary for storing scores is not a bad idea. However, for games with free movement you might have to figure out a different way. Influence maps are usually used to describe the influence that entities such as factions or units have across different positions. In this game however, influence map refers to any data format where a position is mapped to a score.
Modular influence maps
I am a firm believer in modular design. As such, position scoring is also highly modularized. For example, finding optional attack positions works like this:
- Get general layer
- Get cover map (different scores for full and half cover)
- Get threat map (e.g. fire, environmental hazards)
- Get clumping map (to avoid clumping together with friendly units)
- Get move cost map (used to limit movement to movement range)
- Multiply the scores of all maps into a new one
- Get target layer
- Get possible flanking positions if target in cover
- Get positions within optimal range of target considering attack range
- Get elevation map (below is usually a score below 1)
- Multiply the scores of all maps into a new one
- Multiply the scores of the layers into a new map and pick best positions from the it
Multiplying the maps essentially just multiplies the scores at each position with each other, creating a new multiplied map.
static func multiply_maps(maps : Array[InfluenceMap]) -> InfluenceMap:
	var _influence : Dictionary[Vector3, float] = {}
	for i : InfluenceMap in maps:
		for v : Vector3 in i.influence.keys():
			if !_influence.has(v):
				_influence[v] = i.influence[v]
			else:
				_influence[v] *= i.influence[v]
	var new_map := InfluenceMap.new()
	new_map.influence = _influence
	return new_map
Here it is a static function contained in the influence map class. It takes in an array of influence maps and multiplies all their scores together at position v and returns a new influence map.
Separating the influence maps into several different parts helps make the API reusable and easy to manage. The general layer just returns general information about the game world, while the target layer returns information relating to a target.
Using the influence maps
The API that the influence maps use will be game specific. In this game: cover points are nodes that write to a cover registry for quick access. There is a global threat map any hazards can write to. Clumping map uses a flood fill algorithm with a short propagation distance to map out positions close to friendly units. Movement cost uses a BFS algorithm to go through Astar3D points and adding movement cost until the cost is too big.
Note that all scores are used as multipliers. This allows the AI to cull positions if ANY map has a score of zero on it. I find scoring with multipliers is preferrable compared to summing maps, as the values are less chaotic and more controllable. Also, it helps the decision to use the position scores in it’s own scoring, since decision scores are usually within the range of 0—1.
Once the general layer and target layer are ready, they are multiplied into a new map and the best ones are picked. Decisions such as the general Move Attack Decision use this exact logic for position selection.
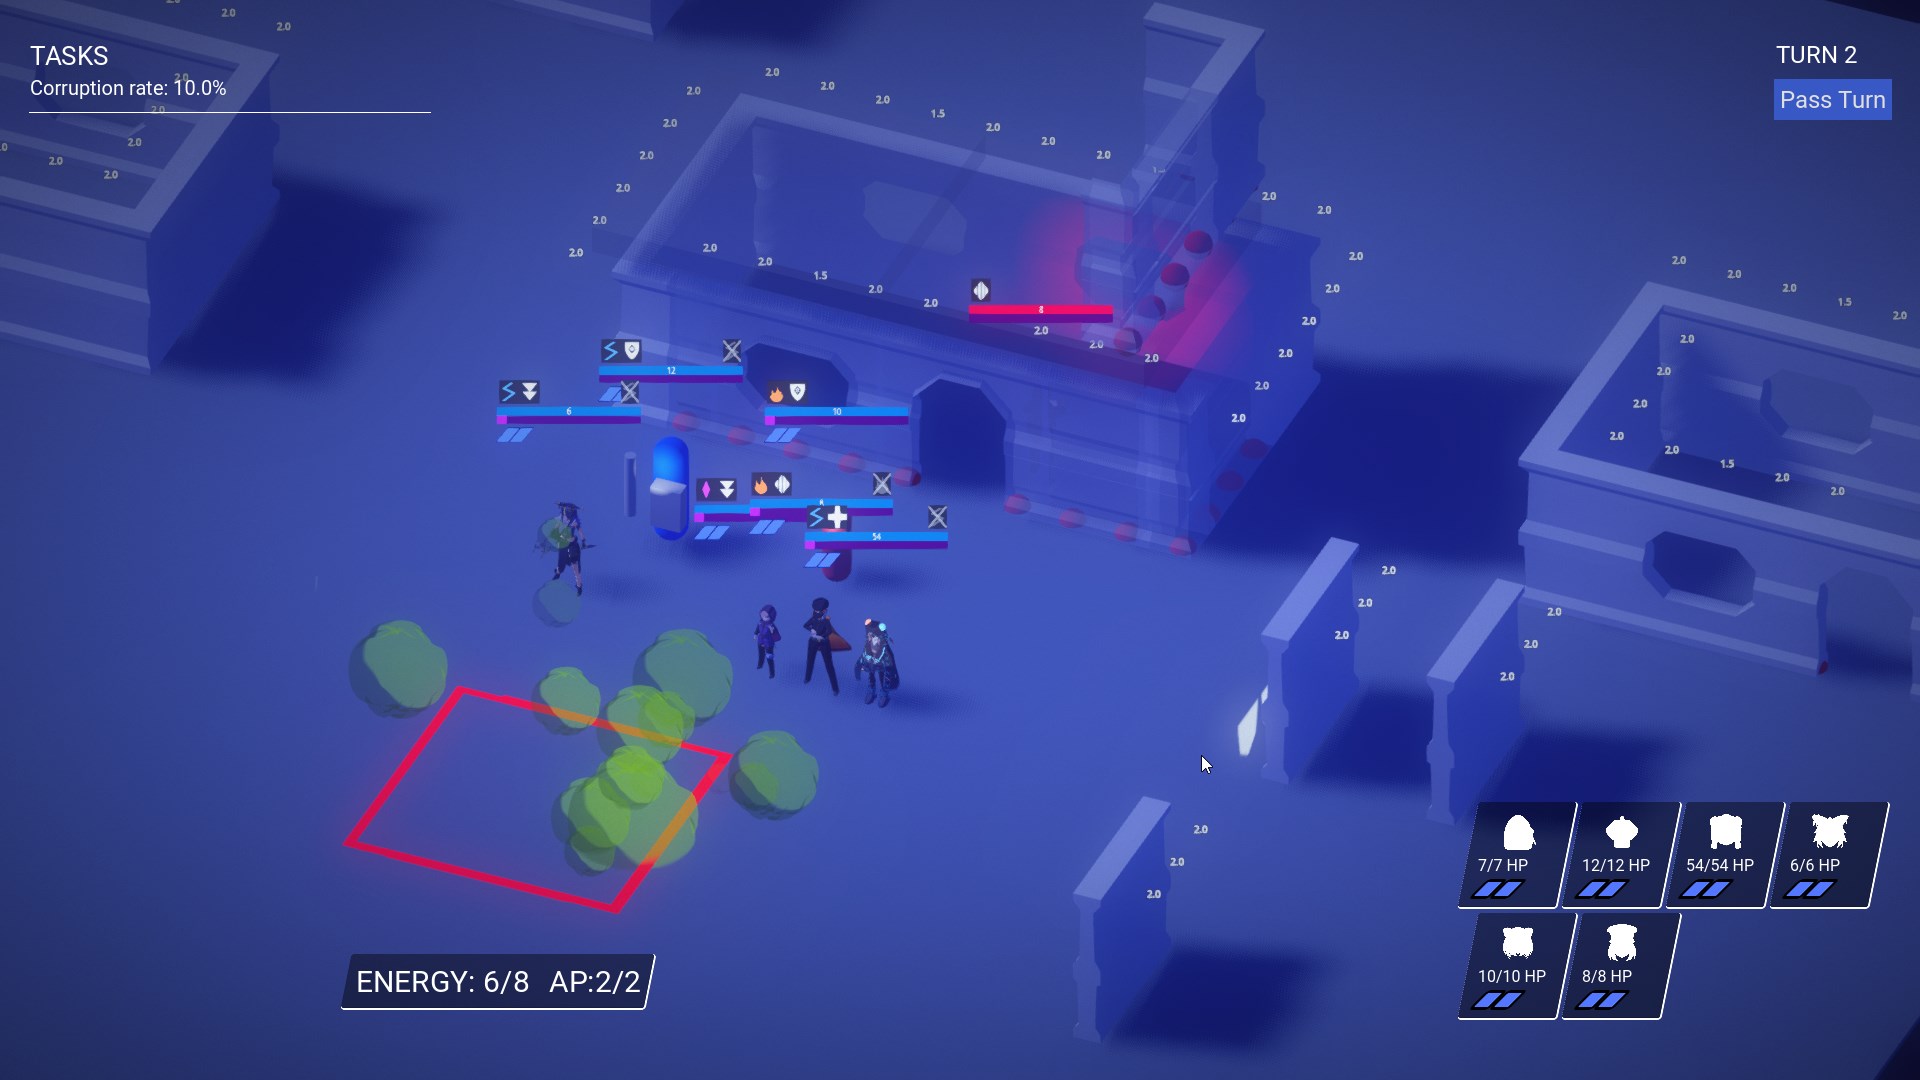 This is what rendering the cover map looks like. Full cover has a score of 2.0 and half cover a score of 1.5. Cover positions the algorithm deems to be in danger of getting flanked are ignored entirely in this photo, though nowadays a score of 0 is set to flanked cover positions to make the AI cull them. Essentially the AI will not go into cover where the weak side is facing the general direction of the enemy.
So position scoring in essence is just assigning values to positions based on certain rules. Good position scoring will result in an AI capable of responding to ANY situation and ANY map.
Notes for using Utility AI
Utility AI is a powerful and flexible system, but it’s also a massive headache. To help you make working with it easier, I have compiled some notes:
- You always want to minimize the amount of variables, to reduce troubleshooting and number tweaking.
- Remember the KISS principle (keep it simple stupid)! Avoid overcomplicating things.
- You can use Utility AI for anything! Selecting positions, selecting targets, selecting actions, etc.
- This guide was made with a turn based tactics game in mind, but it can also be adapted to real time games. You probably don’t want (or need) to calculate the best decision each frame, so add a timer and only recalculate the best action when the timer runs out.
I hope this guide was helpful! I will continue developing Aetherpunk Tactics, and hopefully have a demo out by 2026! If you like character oriented tactics games, make sure to check in every now and then to stay up to date. Bookmark my page for more game dev blog posts! Good luck for making your own Skynet!